How To Seamlessly Integrate Sequelize with Node.js and JavaScript for Database Monitoring


Object-Relational Mapping (ORM) proves invaluable for developers by streamlining the interaction between relational databases and their application code. By abstracting the database interactions into high-level programming constructs, ORM systems like Sequelize alleviate the need for developers to write complex and error-prone SQL queries. This simplification accelerates development cycles and reduces the potential for SQL injection vulnerabilities. Moreover, ORM fosters platform independence, allowing developers to seamlessly switch between different database management systems without rewriting extensive code.
Sequelize offers developers a seamless and efficient means of interacting with databases. It’s written in TypeScript, provides an easy-to-use API for running the queries. While its API is constructed much more like a query builder, it can still help developers to write queries with full type-safety. It supports multiple database engines, gives the ability to escape the queries written by hand, handles parameters, and integrates well with the rest of the ecosystem.
In this blog post we are going to use Sequelize to explore the IMDb dataset. We’re going to build a proper Database Monitoring around to see the performance changes and how to tune the queries. We’ll write an application in JavaScript with Express and a PostgreSQL database. All the code is in GitHub. Let’s begin.
Application Structure
I’m going to implement the application on Amazon Linux 2, but you should be able to run things on any operating system.
Let’s start by downloading the initial code from GitHub. Fork the repository and checkout tag Step_1:
git checkout Step_1
Business Logic
Let’s explore the revision. The entry point is in the main.js file. It load the environment variables, starts the application, and exposes the server on localhost on port 3000:
require('dotenv').config();

const app = require('./app');

async function bootstrap() {
  app.listen(process.env.PORT || 3000, '127.0.0.1');
}

bootstrap();
The server is configured in app.js. We configure logger, CORS, load controllers, and handle errors.
const express = require('express');
const cookieParser = require('cookie-parser');
const logger = require('morgan');
const cors = require('cors');
const controllers = require('./controllers');

function bootstrap(){
  const router = express.Router();
  controllers.initialize(router);

  const app = express();
  app.use(logger('dev'));
  app.use(express.json());
  app.use(express.urlencoded({ extended: false }));
  app.use(cookieParser());
  app.use(cors())

  app.use('/', router);

  app.use(function(req, res, next) {
    res.status(404).send({ error: 'Not found' })
  });

  app.use(function(err, req, res, next) {
    console.log("Error: " + err);
    res.locals.message = err.message;
    res.locals.error = err;
    res.status(err.status || 500).send({ error: err })
  });

  return app;
}

module.exports = bootstrap();
We have two controllers configured. The first one exposes just one method to get the best titles and process the result:
const titleRatingService = require('./title_ratings.service');

module.exports = {
  initialize(router) {
    router.get('/titles/ratings/best', this.handleResult(this.getBestMovies));
  },

  getBestMovies(req, res) {
    return titleRatingService.getBestMovies();
  },

  handleResult(lambda) {
    return (req, res) => Promise.resolve(lambda(req, res))
      .then((results) => res.status(200).send(results))
      .catch((error) => { console.log(error); res.status(400).send(error); });
  }
};
The second one exposes some more methods to get actors, titles by name, crew, and other interesting stuff.
Both controllers are backed by services that don’t return any data yet. You can see them here and here. We also define a set of tests that verify if the application works end to end. The test suite iterates over all the endpoints, calls them one by one, and checks if it received HTTP code 200 indicating success:
require('dotenv').config();
const request = require('supertest');

describe('AppController (e2e)', function (){
  this.timeout(0);

  const endpoints = [
    '/titles/ratings/best',
    '/titles?title=Test',
    '/titlesForAnActor?nconst=nm1588970',
    '/highestRatedMoviesForAnActor?nconst=nm1588970',
    '/highestRatedMovies?numvotes=10000',
    '/commonMoviesForTwoActors?actor1=nm0302368&actor2=nm0001908',
    '/crewOfGivenMovie?tconst=tt0000439',
    '/mostProlificActorInPeriod?startYear=1900&endYear=1912',
    '/mostProlificActorInGenre?genre=Action',
    '/mostCommonTeammates?nconst=nm0000428',
  ];

  let app;

  before(async function() {
    this.timeout(0);

    app = require('../app');
  });

  endpoints.map(url => it(`${url} (GET)`, async function() {
    await request(app)
      .get(url)
      .expect(200);
  }));
});
Let’s now see the data source.
IMDb database
We are going to use the IMDb dataset. You can download the files and transform them into a database, but the easiest way is to take a docker container that does that already. Clone this repository and run the following script:
./start-docker-database.sh
This should run a database locally and expose the port 5432 to the localhost.

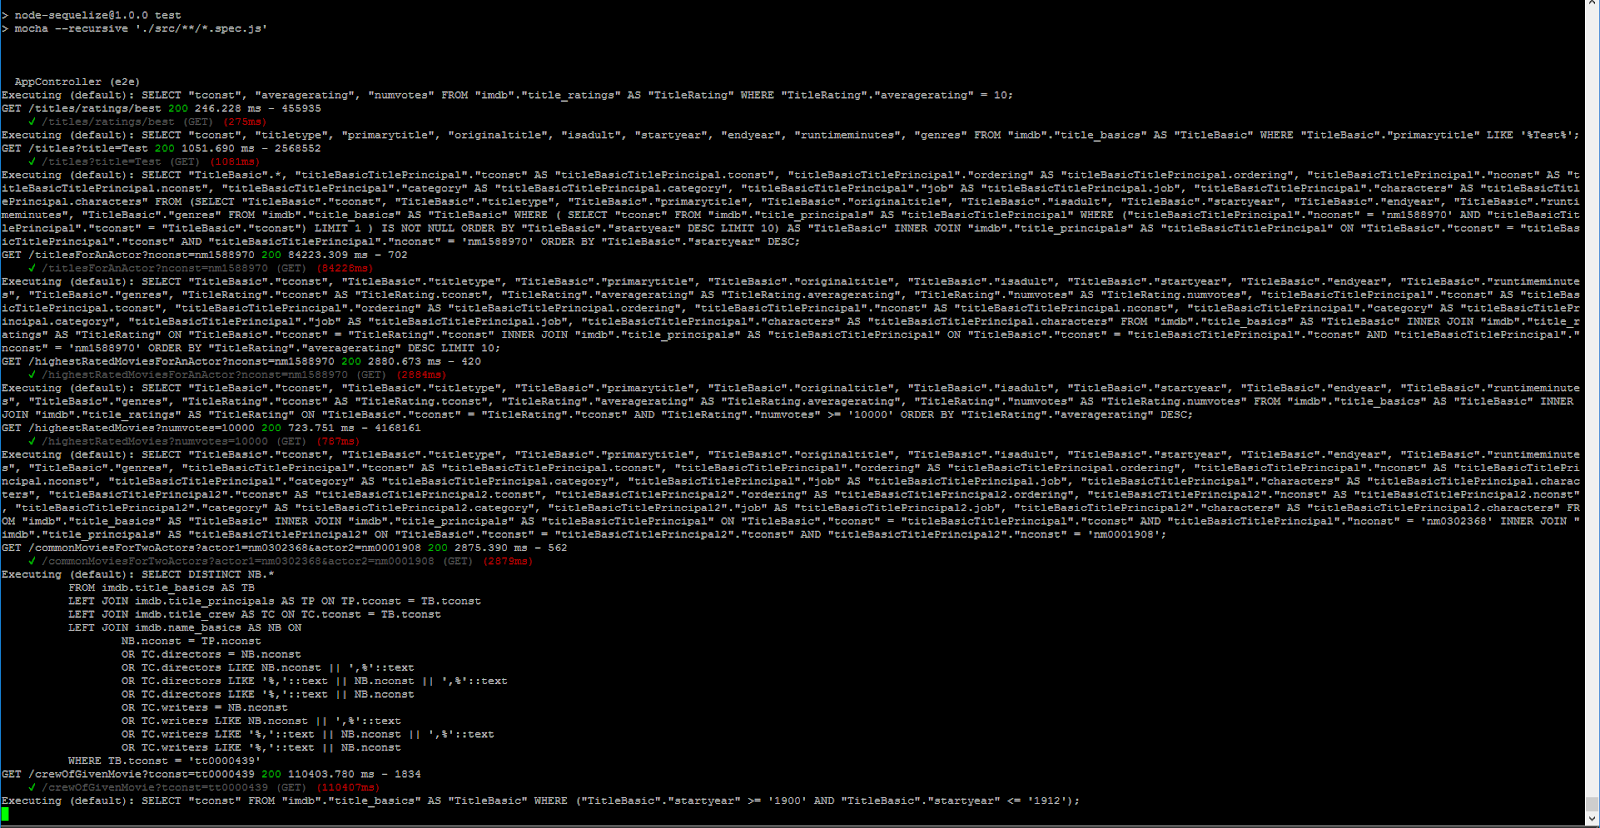
Once you start it and connect to the database, you can see that some columns are not normalized. For instance title_crew has this row:

When joining the data, we’ll need to split these values by comma and do some more processing.
There are two important identifiers in the IMDb dataset: tconst and nconst. tconst is used to indicate a title. nconst is for a name (actor, director, writer, etc.). We’re going to use these identifiers to join tables efficiently.
The dataset has millions of rows so we can use it to analyze the performance easily. Let’s carry on.
Starting the Application
We have multiple scripts in the root directory of the package that let you run things locally. The application can be run both with your local Node installation or inside a Docker container, so you don’t need to install anything locally.
Let’s start the application locally. build-and-run.sh will compile the application locally and expose it on the default port 3000:
Once you run the script, you can verify that it works properly with:
curl http://localhost:3000/titles/ratings/best
This should return an empty array:
[]
You can also run test.sh that will run all endpoint tests locally with mocha:

You can also start the application in docker with start-service.sh or start-service.ps1. You can test it with curl just like before. You can remove the docker afterwards with remove-container.sh and remove-container.ps1.
At this point our application works. Let’s now integrate it with Sequelize.
Integration with Sequelize
We’re now going to install Sequelize. You can run all the commands locally (assuming you have Node configured), or you can just checkout the Step_2 tag and see how it works (especially if you don’t have Node and want to run things in docker only).
Let’s install Sequelize as described in its Getting Started guide:
npm install --save sequelize
npm install --save pg pg-hstore
These commands add the packages to the package.json file. We can now use the Sequelize library to access the database.
Let’s start by defining entities. Let’s create src/names/entities/name_basic.entity.js with the following content:
'use strict';
const { Model } = require('sequelize');
module.exports = (sequelize, DataTypes) => {
  class NameBasic extends Model {
    static associate(models) {
    }
  }
  NameBasic.init(
    {
      nconst: { type: DataTypes.STRING, primaryKey: true, allowNull: false },
      primaryname: { type: DataTypes.TEXT },
      birthyear: { type: DataTypes.INTEGER },
      deathyear: { type: DataTypes.INTEGER },
      primaryprofession: { type: DataTypes.TEXT },
      knownfortitles: { type: DataTypes.TEXT }
    },
    {
      sequelize,
      modelName: 'NameBasic',
      tableName: 'name_basics',
      schema: 'imdb',
      timestamps: false,
    }
  );
  return NameBasic;
};
We import Sequelize, and then create a class NameBasic that extends the Model. We define fields like nconst or primaryname, and we define the model name as NameBasic. We can carry on defining other entities the same way.
Next, we need to initialize Sequelize when loading the module. Let’s create src/models/index.js:
'use strict';

const Sequelize = require('sequelize');
const process = require('process');
const db = {};
const fsPromises = require('fs').promises;

let sequelize = new Sequelize(process.env['DATABASE_URL'], { dialect: 'postgres' });

let models = [
  '../titles/entities/title_rating.entity',
  '../titles/entities/title_basic.entity',
  '../titles/entities/title_principal.entity',
  '../titles/entities/title_crew.entity',
  '../names/entities/name_basic.entity',
];

(function createModels() {
  models.forEach((file) => {
    const model = require(file)(sequelize, Sequelize.DataTypes);
    db[model.name] = model;
  });

  Object.keys(db).forEach((modelName) => {
    if (db[modelName].associate) {
      db[modelName].associate(db);
    }
  });
})();

(function createRelations() {
  (function joinTitleBasiclAndTitlePrincipal(){
    db.TitleBasic.hasMany(db.TitlePrincipal, {
      foreignKey: 'tconst',
      targetKey: 'tconst',
      as: 'titleBasicTitlePrincipal',
    });

    // Another association to allow for two joins when taking movies for two actors
    db.TitleBasic.hasMany(db.TitlePrincipal, {
      foreignKey: 'tconst',
      targetKey: 'tconst',
      as: 'titleBasicTitlePrincipal2',
    });

    db.TitlePrincipal.belongsTo(db.TitleBasic, {
      foreignKey: 'tconst',
      targetKey: 'tconst'
    });
  })();

  (function joinTitlePrincipalAndNameBasic() {
    db.TitlePrincipal.hasOne(db.NameBasic, {
      foreignKey: 'nconst',
      targetKey: 'nconst',
      sourceKey: 'nconst'
    });

    db.NameBasic.belongsTo(db.TitlePrincipal, {
      foreignKey: 'nconst',
      targetKey: 'nconst',
      sourceKey: 'nconst'
    });
  })();

  (function joinTitleRatingAndTitleBasic() {
    db.TitleBasic.hasOne(db.TitleRating, {
      foreignKey: 'tconst',
      targetKey: 'tconst'
    });

    db.TitleRating.belongsTo(db.TitleBasic, {
      foreignKey: 'tconst',
      targetKey: 'tconst'
    });
  })();

  (function joinTitleBasicAndTitleCrew(){
    db.TitleBasic.hasOne(db.TitleCrew, {
      foreignKey: 'tconst',
      targetKey: 'tconst',
    });

    db.TitleCrew.belongsTo(db.TitleBasic, {
      foreignKey: 'tconst',
      targetKey: 'tconst'
    });
  })();
})();

db.sequelize = sequelize;
db.Sequelize = Sequelize;

module.exports = db;
We create a new Sequelize instance that connects to the database with the connection string obtained from the environment variables. The environment variables are loaded from the .env file and the connection string points to the local database.
Next, we load entities, define relations between tables, and finally set exports so we can use them from outside of this module.
We can now start using Sequelize. Let’s modify title_ratings.service.js and extract some best movies:
const titleRating = require('../models').TitleRating;

module.exports = {
  getBestMovies() {
    return titleRating
      .findAll({
        where: {
          averagerating: 10.0
        }
      });
  }
};
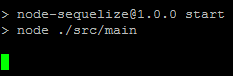
You can see that we import the TitleRating class, and then use the findAll method to filter movies with 10 stars. You can now start the application and use curl to verify that the endpoint returns data now. You can also rerun tests to see that all works, and that the endpoint for getting best titles is sending an SQL query:
Writing Queries with Sequelize
We can now add more queries to do some more sophisticated logic. Just like before, you can modify the code manually, or checkout the tag Step_3. All the changes are in this commit.
Go to src/titles/titles.service.js and add the following imports at the top of the file:
const { Op } = require("sequelize");
const sequelize = require('../models').sequelize;
const titleBasic = require('../models').TitleBasic;
const titlePrincipal = require('../models').TitlePrincipal;
const titleRating = require('../models').TitleRating;
const titleCrew = require('../models').TitleCrew;
const nameBasic = require('../models').NameBasic;
Let’s now implement the method to get all the titles by their name:
  getTitles(title) {
    return titleBasic
      .findAll({
        where: {
          primarytitle: { [Op.like]: '%' + title + '%' }
        }
      });
  },
You can see that the structure of the query is the same. We use the findAll method, but this time we need to configure the filter a little bit differently. We want to use the LIKE operator that will do the “contains” operation.
Let’s now implement a method to get all the titles for a given actor:
  titlesForAnActor(nconst) {
    function titlesForAnActorNaive() {
      return titleBasic
        .findAll({
          include: [{
            model: titlePrincipal,
            required: true,
            as: 'titleBasicTitlePrincipal',
            where: {
              'nconst': nconst
            },
          }],
          order: [
            ['startyear', 'DESC']
          ],
          limit: 10
        });
    }

    return titlesForAnActorNaive();
  },
We take the table title_basic and then join it with title_principal using the tconst column. Next, we filter based on the nconst identifier, and finally sort the result by the startyear to get the latest movies first. We return ten of them.
Similarly, we can get the highest rated movies for an actor:
 highestRatedMovies(numvotes) {
    function highestRatedMoviesNaive() {
      return titleBasic
        .findAll({
          include: [
            {
              model: titleRating,
              required: true,
              duplicating: false,
              where: {
                'numvotes': { [Op.gte]: numvotes }
              }
            },
          ],
          order: [
            [ titleRating, 'averagerating', 'DESC'],
          ]
        });
    }

    return highestRatedMoviesNaive();
  },
We join title_basic with title_rating, do the filtering, and finally we order the result based on the star rating of the movie.
Sequelize is very powerful, however, sometimes it’s easier to implement the SQL query directly. We can do it like this to get the crew of a movie:
 crewOfGivenMovie(tconst) {
    function crewOfGivenMovieManualSlow(){
        return sequelize.query(`
          SELECT DISTINCT NB.*
          FROM imdb.title_basics AS TB
          LEFT JOIN imdb.title_principals AS TP ON TP.tconst = TB.tconst
          LEFT JOIN imdb.title_crew AS TC ON TC.tconst = TB.tconst
          LEFT JOIN imdb.name_basics AS NB ON
                  NB.nconst = TP.nconst
                  OR TC.directors = NB.nconst
                  OR TC.directors LIKE NB.nconst || ',%'::text
                  OR TC.directors LIKE '%,'::text || NB.nconst || ',%'::text
                  OR TC.directors LIKE '%,'::text || NB.nconst
                  OR TC.writers = NB.nconst
                  OR TC.writers LIKE NB.nconst || ',%'::text
                  OR TC.writers LIKE '%,'::text || NB.nconst || ',%'::text
                  OR TC.writers LIKE '%,'::text || NB.nconst
          WHERE TB.tconst = :tconst
        `, {
          model: nameBasic,
          mapToModel: true,
          replacements: {
            tconst: tconst
          }
      });
    }

    return crewOfGivenMovieManualSlow();
  },
As mentioned before, some columns in IMDb are stored as CSV values. In order to find a specific component of the CSV, we need to split it by commas and do some pattern matching. Later we’re going to see how to do the same in a different way.
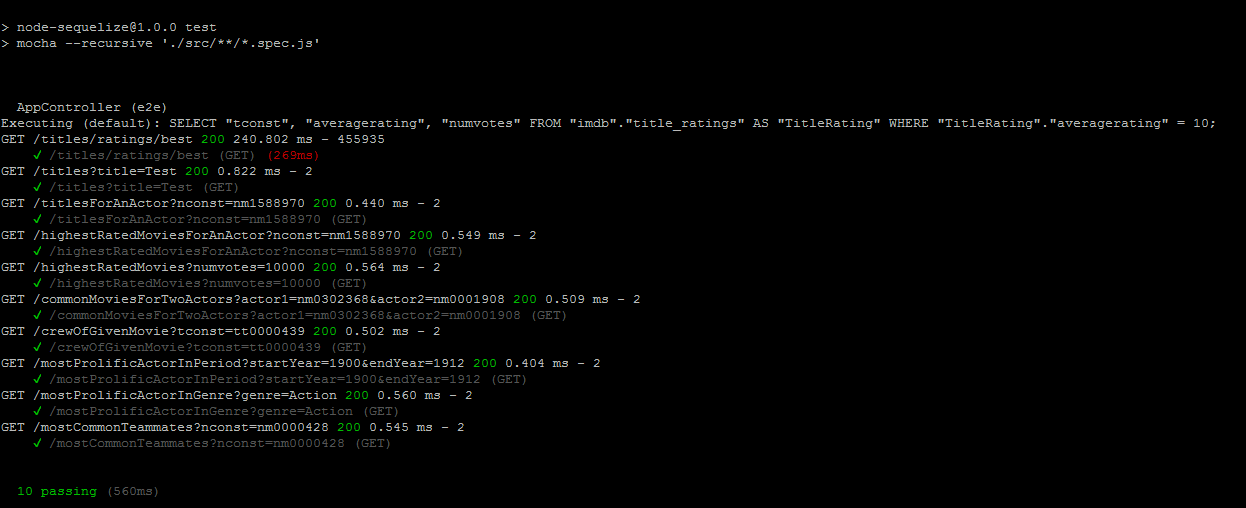
Let’s now run all the tests and see that they send actual queries and get more data:
Introducing Database Monitoring and Observability
Our application works, but we have no idea what it does and what queries it generates. We don’t know whether it’s going to be fast enough when deployed to production. We need to see behind the scenes to make sure that everything works well.
We’re going to integrate the application with Metis to build Database Monitoring. This way we’ll be able to see the performance issues and optimize our queries before going to production.
Before moving on, go to Metis and create a project over there. You’ll need an API key to integrate the application.
You can see all the changes in the tag Step_4. We’re going to implement the instrumentation as it’s described in the documentation. Let’s start by installing the dependencies. Metis uses OpenTelemetry to extract details of the REST calls and the SQL queries. No confidential data is sent to the platform because Metis captures the execution plans only.
npm install --save pg @metis-data/pg-interceptor

npm install --save @opentelemetry/api \
                   @opentelemetry/context-async-hooks \
                   @opentelemetry/instrumentation \
                   @opentelemetry/instrumentation-http \
                   @opentelemetry/resources \
                   @opentelemetry/sdk-trace-base \
                   @opentelemetry/semantic-conventions
Once this is done, we need to add the tracing configuration. Add the file src/tracer.js:
let opentelemetry = require('@opentelemetry/api');
let { registerInstrumentations } = require('@opentelemetry/instrumentation');
let {
  BasicTracerProvider,
  BatchSpanProcessor,
  ConsoleSpanExporter,
  SimpleSpanProcessor,
} = require('@opentelemetry/sdk-trace-base');
let { getMetisExporter, getResource, MetisHttpInstrumentation, MetisPgInstrumentation } = require('@metis-data/pg-interceptor');
let { AsyncHooksContextManager } = require('@opentelemetry/context-async-hooks');

let tracerProvider;
let metisExporter;

const shudownhook = async () => {
  console.log('Shutting down tracer provider and exporter...');
  await tracerProvider?.shutdown();
  await metisExporter?.shutdown();
  console.log('Tracer provider and exporter were shut down.');
}

process.on('SIGINT', () => {
  shudownhook().finally(() => process.exit(0));
});
process.on('SIGTERM', () => {
  shudownhook().finally(() => process.exit(0));
});

const connectionString = process.env.DATABASE_URL;

const startMetisInstrumentation = () => {
  tracerProvider = new BasicTracerProvider({
    resource: getResource(process.env.METIS_SERVICE_NAME, process.env.METIS_SERVICE_VERSION),
  });

  metisExporter = getMetisExporter(process.env.METIS_API_KEY);

  tracerProvider.addSpanProcessor(new BatchSpanProcessor(metisExporter));

  if (process.env.OTEL_DEBUG === "true") {
    tracerProvider.addSpanProcessor(new SimpleSpanProcessor(new ConsoleSpanExporter()));
  }

  const contextManager = new AsyncHooksContextManager();

  contextManager.enable();
  opentelemetry.context.setGlobalContextManager(contextManager);

  tracerProvider.register();

  const excludeUrls = [/favicon.ico/];
  registerInstrumentations({
    instrumentations: [new MetisPgInstrumentation({ connectionString }), new MetisHttpInstrumentation(excludeUrls)],
  });
};

module.exports = {
  startMetisInstrumentation,
  shudownhook,
};
We extract the Metis API key, add a processor for OpenTelemtry’s spans, and register the instrumentation for Pg (SQL driver) and HTTP (network calls). Finally, we need to add the environment variables to the .env file:
DATABASE_URL=postgres://postgres:postgres@127.0.0.1:5432/demo?schema=imdb
METIS_API_KEY=YOUR_API_KEY
METIS_SERVICE_NAME=sequelize
METIS_SERVICE_VERSION=1
METIS_API_KEY is the key of your project. METIS_SERVICE_NAME and METIS_SERVICE_VERSION can be whatever you like. These two values are used just to indicate what application sent the trace. You can use it to do versioning, differentiate between developer and production versions, or to integrate that with your CI/CD pipeline.
All the code is ready. We can now enable the instrumentation so our application uses it. Let’s call startMetisInstrumentation in the main entrypoint and in the tests. This way we can capture the performance insights when we use our application locally or when we run the automated test suite. Let’s now start the application and use curl to test the endpoint:
curl http://localhost:3000/titles/ratings/best
This should return multiple titles. Let’s now go to your Metis project, go to “Recent Activity” tab, and you should see something like this:

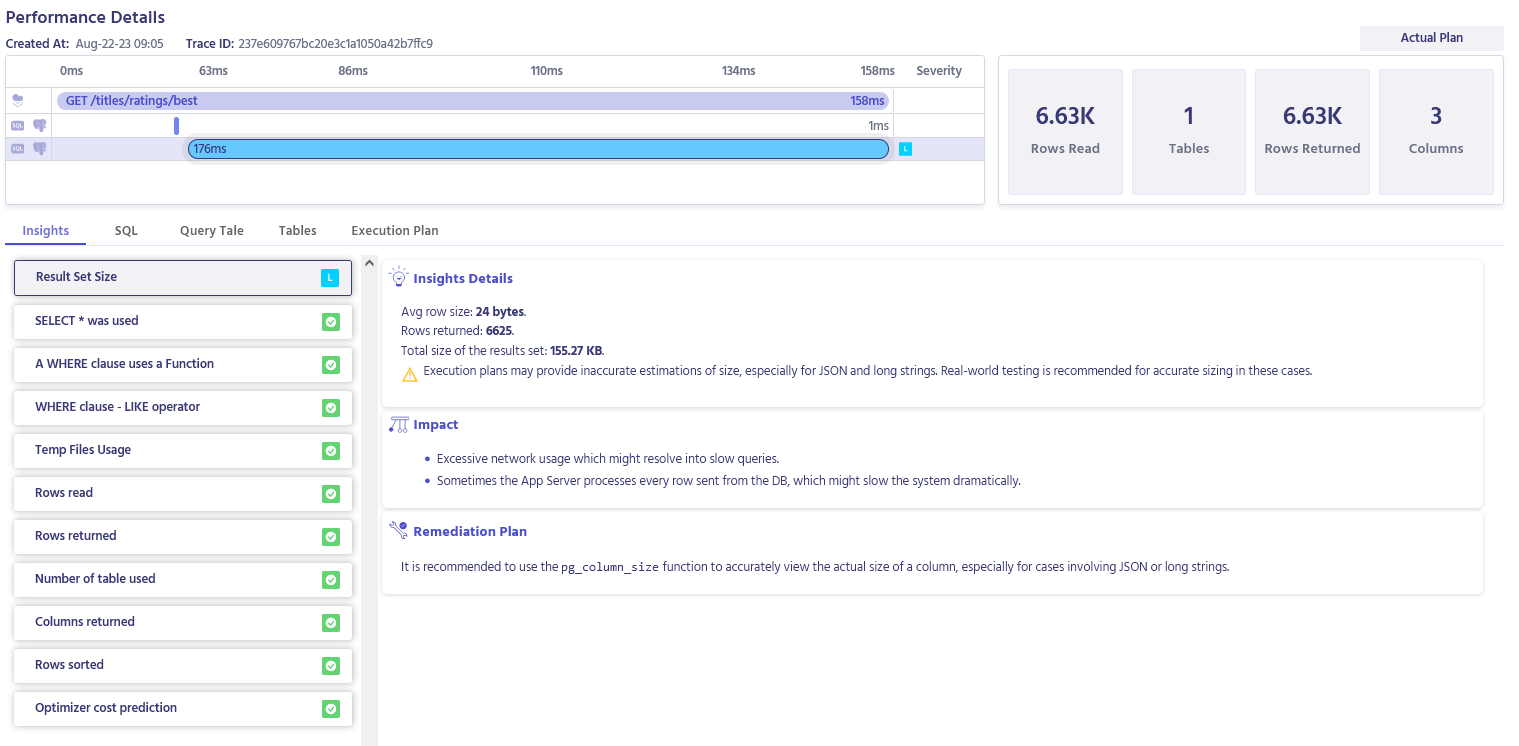
You can see Metis captured the call to the titles/ratings/best endpoint. We can see that the endpoint returned HTTP code 200. Let’s now click on this execution and we should get to this screen:

You can see the spans at the top. There are multiple of them as the Sequelize configures the database initially before running the first query. The last span indicates our actual SQL query that has been executed. You can click on the SQL tab to see the query text:

You can see the query that Sequelize sent! This is the same query we saw in the logs. However, this time we can analyze it automatically. Go back to the Insights tab and see the following:

Metis shows us that the query reads over a million of rows by scanning the whole table. This is a critical problem because it won’t scale well when we deploy to production. Let’s fix that.
Using Database Monitoring to Improve the SQL Query Performance
Let’s add an index. The code is in the tag Step_5. First, let’s create a migration that we will execute when starting the application. Let’s add src/models/migrations/001_create_title_ratings_indexed.sql:
CREATE INDEX IF NOT EXISTS title_ratings_index ON imdb.title_ratings(averagerating);
This will create an index on the table to make sure our query runs faster. Let’s now implement a little bit of code to run this migration. Add this method to src/models/index.js:
(function seed(){
  db.seedDatabase = async () => {
    let files = await fsPromises.readdir('src/models/migrations/');
    for(let id in files) {
      if(files[id].endsWith(".sql")){
        let data = await fsPromises.readFile('src/models/migrations/' + files[id], 'utf8');
        console.log("Running " + data);
        try{
          console.log(await sequelize.query(data));
        }catch(e){
          console.log(e);
          throw e;
        }
      }
    }

    console.log("Done migrating");
  };
})();
Let’s now call this method in the entrypoint and in the tests.
Let’s now restart the application and see this:

Great, the migration has been executed. We can now run curl again and go to Metis project to see this:

You can see there is another call, the one we just did. Let’s open it up and see that the query is now fast enough:
You can see that the query reads about seven thousand rows now. This is a great performance improvement.
Improving Other Queries
We have all the pieces in place now. Let’s see how to use the new Database Monitoring and Observability with Sequelize to improve the performance. There are multiple improvements we can do here, so I’ll just show some of them. See the tag Step_6 to see more and read our article How Metis Optimized Queries Executed by Sequelize to get even more ideas.
Let’s revisit the query returning movies for an actor. Run it with curl:
curl http://localhost:3000/titlesForAnActor?nconst=nm1588970
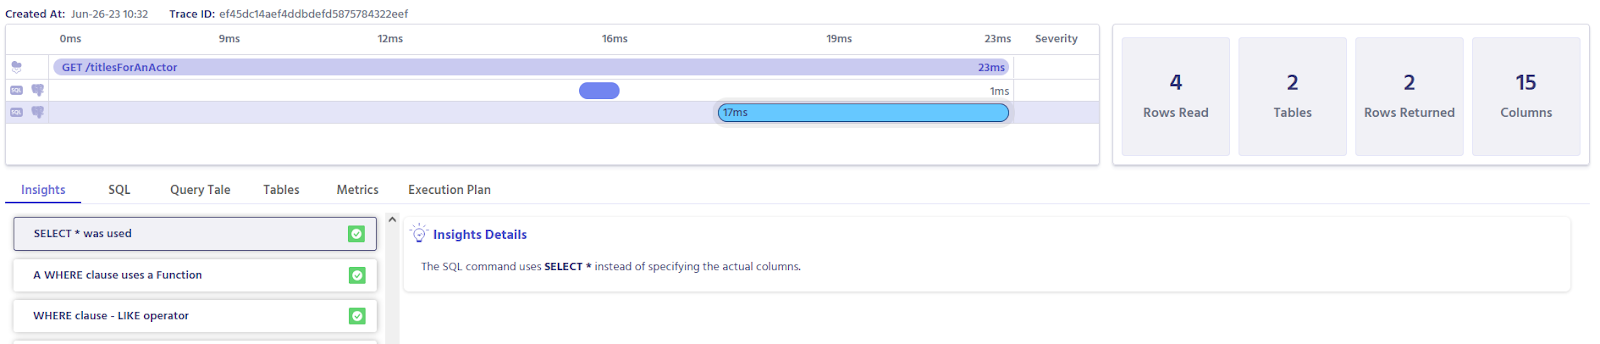
Go to Metis and see that the call has been captured:

There are critical issues. Let’s see them:

We can see the query read 70 million rows. That’s a lot! Let’s see the query text:
SELECT
  TitleBasic.*,
  titleBasicTitlePrincipal.tconst AS titleBasicTitlePrincipal.tconst,
  titleBasicTitlePrincipal.ordering AS titleBasicTitlePrincipal.ordering,
  titleBasicTitlePrincipal.nconst AS titleBasicTitlePrincipal.nconst,
  titleBasicTitlePrincipal.category AS titleBasicTitlePrincipal.category,
  titleBasicTitlePrincipal.job AS titleBasicTitlePrincipal.job,
  titleBasicTitlePrincipal.characters AS titleBasicTitlePrincipal.characters
FROM
  (
    SELECT
      TitleBasic.tconst,
      TitleBasic.titletype,
      TitleBasic.primarytitle,
      TitleBasic.originaltitle,
      TitleBasic.isadult,
      TitleBasic.startyear,
      TitleBasic.endyear,
      TitleBasic.runtimeminutes,
      TitleBasic.genres
    FROM
      imdb.title_basics AS TitleBasic
    WHERE
      (
        SELECT
          tconst
        FROM
          imdb.title_principals AS titleBasicTitlePrincipal
        WHERE
          (
            titleBasicTitlePrincipal.nconst = 'nm1588970'
            AND titleBasicTitlePrincipal.tconst = TitleBasic.tconst
          )
        LIMIT
          1
      ) IS NOT NULL
    ORDER BY
      TitleBasic.startyear DESC
    LIMIT
      10
  ) AS TitleBasic
  INNER JOIN imdb.title_principals AS titleBasicTitlePrincipal ON TitleBasic.tconst = titleBasicTitlePrincipal.tconst
  AND titleBasicTitlePrincipal.nconst = 'nm1588970'
ORDER BY
  TitleBasic.startyear DESC;
This is definitely not something we expected. Let’s try making it faster and introduce an index:
CREATE INDEX IF NOT EXISTS title_principals_nconst_idx ON imdb.title_principals(nconst) INCLUDE (tconst);
You can add another migration, rerun the application and see that it helps a bit, but is definitely not enough.
Let’s try to understand why Sequelize generated such a weird query. We joined two tables, ordered the rows based on the startyear, and then returned ten rows. However, Sequelize doesn’t know if the join can create duplicates. In that case, Sequelize needs to go with subqueries to calculate the proper ordering. We can fix that by using the duplicating flag:
return titleBasic
    .findAll({
        include: [{
            model: titlePrincipal,
            required: true,
            duplicating: false,
            as: 'titleBasicTitlePrincipal',
            where: {
                'nconst': nconst
            },
        }],
        order: [
            ['startyear', 'DESC']
        ],
        limit: 10
    });
We can now restart the application and see that this is the query we now get:
SELECT
    TitleBasic.tconst,
    TitleBasic.titletype,
    TitleBasic.primarytitle,
    TitleBasic.originaltitle,
    TitleBasic.isadult,
    TitleBasic.startyear,
    TitleBasic.endyear,
    TitleBasic.runtimeminutes,
    TitleBasic.genres,
    titleBasicTitlePrincipal.tconst AS titleBasicTitlePrincipal.tconst,
    titleBasicTitlePrincipal.ordering AS titleBasicTitlePrincipal.ordering,
    titleBasicTitlePrincipal.nconst AS titleBasicTitlePrincipal.nconst,
    titleBasicTitlePrincipal.category AS titleBasicTitlePrincipal.category,
    titleBasicTitlePrincipal.job AS titleBasicTitlePrincipal.job,
    titleBasicTitlePrincipal.characters AS titleBasicTitlePrincipal.characters
FROM
    imdb.title_basics AS TitleBasic
INNER JOIN imdb.title_principals AS titleBasicTitlePrincipal ON TitleBasic.tconst = titleBasicTitlePrincipal.tconst AND titleBasicTitlePrincipal.nconst = 'nm1588970'
ORDER BY
    TitleBasic.startyear DESC
LIMIT
    10;
Once we add the index and the proper flag for handling duplicates, we get the following performance:
You can see that now it is good enough to be deployed to production.
Summary
In this post we saw how to build a Database Monitoring with Sequelize. We saw how to analyze the SQL query performance, how to monitor the database, and how to optimize the application with actual IMDb dataset. This way you can supercharge all your applications and queries before going to production. And if that’s not enough, read our article about Improving Database Performance to handle database issues like a pro.
FAQ
What is the purpose of using Sequelize ORM with the IMDB dataset?
We can simplify reading the database objects from the JavaScript application and run SQL queries in a much better way.
How can I import and preprocess the IMDB data using Sequelize?
We can use the docker database that exposes the IMDb entities. Then, we can map them to entities in Sequelize and read from a JavaScript application.
What are the key features of Sequelize for IMDB dataset analysis?
Sequelize lets us configure relations and simplify the way we write queries. We can automatically verify types, existence of columns, or whether the query is going to execute properly at all.